Showing posts with label Stampin' Up. Show all posts

Monday, 17 June 2013

Bill Withers would be pleased


Hello there

 Yes, Bill Withers and his song 'lovely day' says it all. On Saturday I had a lovely time with some ladies whom hopefully I will be able to call friends soon. 
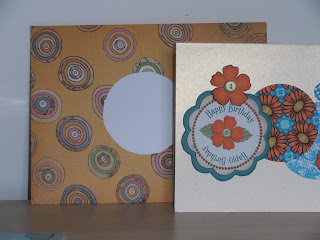
The leaves and the swirls are from the Cricut
Home Accents cartridge

I have only known Polly for less than a week. Polly had mentioned on a local Facebook page that she might consider setting up a sewing group, so I commented that I would be interested. This developed into a Facebook chat when Polly told me about a crafting group that she belongs to and it just happened to be meeting on Saturday. I went along and her and the other ladies made me feel very welcome and I spent a very relaxed time there for a few hours.

I mainly did listening and drinking tea but I also did lots of cutting and taking some die cuts off the Cricut mats. I really shouldn't have done them quickly the night before as I had put paper onto new mats, which is never a good idea, as the new mats are too sticky and make peeling the paper off quite tricky. I made large inroads to three cards though and then finished them off at home that night.

The flowers are from the Everything Eleanor Stampin' Up set
and the centre cream background and sentiment background
 is from the Cricut Craftroom basics set


I got to see Polly's wonderful City and Guild's Design and Craft (embroidery) portfolio and Kate's gorgeous coloured cross stitch and another lady did mosaic and Polly was making these really cute bottle top pin cushions. There was quite a range of things being worked on whilst the chat continued. I am seriously considering doing a City and Guild's course myself but I might try the quilting one. They also mentioned a sewing workshop centre in Thornton, Lancashire which is gorgeous too. I looked online and saw that they're running a two day 'Quilt top in a day' course in July; you do the top on one day and the backing and binding on the second day :-)

The first ever cuts with my mini tattered florals dies

Crafting really has helped me to meet the most lovely of people.

Take care out there and appreciate the good people.

Sunday, 9 June 2013

This is my kinda housework

Hello there

I've been tidying up! Aren't I a good girl? :-)

Maybe not as good as all that, as all I've tidied up are some paper pieces from my desk.

I told you in yesterday's post about a little pile I still had left of a digi kit I had printed. 
Well this morning I have put them to good use and no longer have any left.

I got the last piece into the inside of this card

Couldn't resist the opportunity to use some spray
to create another circle on the envelope 


Tidier desk; time spent enjoying myself and two pretty cards at the ready = RESULT!

Take care out there 

p.s. I got 51 views on my blog yesterday. It might not sound alot to many of you but it's brilliant for me. Many of them were from some site called yandex.ru, so I can only hope that Russian site/company is a reputable one!
I often don't share the cards I make these days as it just adds too much time onto the actual making of the cards themselves but I hope that someone out there enjoys seeing a few occasionally.

Friday, 17 May 2013

Music No.2

Hello there

Oh dear my subject title reminded me of the song 'Mambo No.5 - I'm now singing in my head with a bit of a body wobble :-) - such a happy song though.

Here's the second of the scrapbook pages I've created using the freebie Music layout pieces and the cut-file, as described in my last post.
There are more photos and the journalling on the tags behind the
raised photo

The stitching work and the inking of
the letters with a Spectrum Noir pen
make alot of difference
Putting the layers at different levels
yet connecting letters to those,
made it flow so well


I really like how easily these came together. I've never done a double
page layout of any kind. With several photos for one event, I
could definitely be persuaded to try this again. 
If you're into your Cricut, I'd recommend keeping an eye on Cricut Craft Room in conjunction with the project page on the Cricut website, to give you ideas for what to do with the cuts.  I saw on Obsessed with Scrapbooking's blog that they have got two new layout based cartridges out which look great, so I'm going to have to be quick to get these preview type cuts done quickly before I have to buy a cartridge :-)

Take care out there

Wednesday, 15 May 2013

Music

Hello there

This layout was done after I got inspired by a Cricut Craft Room cut-file from the Cricut project page. I found some free cuts on CCR which are items for various layouts but I needed to see an actual example of what those cuts could create and I loved the example using the music layout on that project page, so I promptly imported the cut file and got using the free dies - all FREE I say - how brill!

Sorry about the poor light but our weather is so bad, I can't expect it
to be much lighter during the day. I've used my daylight lamp, so
that stops the photo being yellow in tone but it's given alot of shine on
the M and U


The journalling is on a tag behind the photo


The background paper is fab; it's from the Stampin' Up Tickets and tags kit I think. The lines on it made it so easy to line up, as often my lining up is far from perfect. I also think it fits this theme/photo to a tee with it's grungy feel. Most of the papers are from Heidi Swapp's Sugar Chic pad; it's perfect for the colours and patterns in the photo. The silver/grey marbled effect paper has been in my stash for a long time; I hadn't thought it would die-cut very well but it was easy peasy and looks a treat.

The machine and hand sewing was great fun too and the washi tape, well, it just had to be done :-)


I'm going to have to get a few layouts done quickly whilst this is still going for free, as there are more photos of this night I want to capture and some other photos of another 'gig' my daughter went to a couple of months ago. I could do a double page layout of this night using the same papers as this and mixing it up a bit with the die-cuts and design.
Let's hope I get time, as 'him indoors' is back tomorrow from a holiday he's been on with his mum, so I might have to forego some crafting. How bad am I, that I am reluctant to give up that for a catch-up evening with Chris?! Don't get me wrong, I love Chris but I'm also a tight mare and don't want to give up the chance of using a freebie :-)

Take care out there

Sunday, 7 April 2013

Spring crop

Hello

Here's a little catch-up for you on what I've been up to this weekend. I've been in Rochdale for a crafty time with some lovely, fun loving ladies. Carole Bryson Wood organised the weekend for us and along with Marlene and lots of other helpers and it all went very smoothly indeed and jam packed full of happy memories of very loud laughing mixed with random mannequins (it's too long a story to explain :-) ) and quiet creative times.

Rebecca on the left, Cherry being
naughty and 'Dolly Daydream'
on the right :-)


The weather was very cold but sunny, so that helped the mood along too I'm sure, as there were lovely big windows in the venue. We had loads of space with a fully equipped kitchen (from where Carole and the gang made us loads of food) and a well stocked craft room, so it was brilliant.


On the first day I made five cards instead of six (I'm too embarrassed to say why I only achieved 5) and a layout and some playing about.
Today I made most of a layout; an 8 x 8 scrap page for a challenge and a 12 x 12 'no photos allowed' challenge page. This isn't very productive for two days I know but I had a ball and played with some stamps and colouring too, so who cares?! 

This is the 8 x 8 page. We had to use the paper from a scraps box; we could use two embellishments; no stamps and we could create a title and use a mask; we were also allowed to use our own page base.

I used Catherine's sketch of the month to inspire me; which is just one example of one of my gorgeous friends helping me over the weekend.

The photo-less page was started by me wanting to use the negative of some die-cutting I'd been doing and then Rebecca took it from there to the fantastic place it ended in. I was talking to Kathie about what I could possibly do with them, when Rebecca overheard and came up with the fabbo idea of filling each star shape with places I'd been on holiday to and Kathie said 16 reasons why I think you're a star (aimed at my daughter). So then I thought of doing 16 places I love. The whole process of us making decisions together was great fun. 
Kathie made sure that my negatives weren't
'too' randomly placed
Fabbo Kathie having a fun time
I consider myself very lucky to know these ladies and having met even more caring, sharing ladies this weekend, my luck clearly hasn't changed. One lady for example gave up her raffle prize (a large album) for her friend, who'd said earlier that she really liked it.


Take care out there, let the good times roll and have a go at doing your own list of favourite places and note them in an album, so that you could share them with your family and friends and get them to do the same and learn more about each other.

Wednesday, 30 January 2013

Scary stuff

Hello there

Tonight I've spent some happy times with my crafty girlfriends using a pack Catherine made up using elements of the Stampin' Up Afternoon Daydreams simply scrappin' kit. There are some really lovely elements in there and the papers are pretty gorgeous too.
Catherine had designed three cards for us and a scrapbook layout. I didn't get to start on the layout but I can do that tomorrow. 

The scary part was the brayering, which I've only done once before. Once you get the need to be gentle with the brayer though; roll from off the cardstock and roll off at least once before using it, it's quite an easy process really. You need to know which colours to use together to get the invisible link between them and Catherine is excellent at that and oh, so patient, hence I was able to get great effects. 

This is just such a moody image but the embossed 'pool party' card and the colours of the patterned papers and the sentiment with the ribbon, all help to bring 'it out'.  The twine help to 'ground' the trees too. Catherine's a very clever girl.


I think this is my best one with the sun in exactly the right place.
My brayering was rather heavy handed on this but I still love the
effect.

Look at the way that sun sits so well behind the branches-
pretty as a picture! 


I am so pleased with these cards and I'm so lucky to have talented friends who don't mind sharing their skills with me.

Take care out there

Friday, 18 January 2013

Freebies

Hello there

Last week on Cricutcraftroom they had another pile of free images on there just for a week; every week there's a different cartridge/range of images that you can cut for free. I didn't like the actual images they had on there but my eye was caught by the photo mats, which have the slits cut out for you to fit your photo/topper in. So I got to cut out a pile of left over card in a couple of colours. Today's layout uses the cut outs and the negatives from that. 

I got my layout inspiration from a Basically bare blog entry. Although after saying that I just went with the creative flow really with the materials I wanted to use and what I have/found, which I find to be so satisfying.
I wonder if you noticed the dribbles again - my Stampin' Up ink
is going to get lots of use, me thinks! :-)
I had intended on using some wire to replicate the swirls on the float but whilst I was searching for it (I still haven't found it!) I came across this punch; I keep them at the back of a shelf as I don't really like them but oh boy, was I pleased to find this one at this time - it was meant to be! :-)
Yet again, I used the cut outs, and the negative and I also used sections of the die-cut as a stencil for the background. The only reason I used the top right hand corner negative piece though, was to cover the spraying mistake I made there. Happy accident!


Sarah Hurley and Serif also saved the day with the postcard from her digikit on Daisytrail which I found whilst looking for a postcard on CraftArtist.


Yay- another great creative morning!
Now to wait for the text from the school saying that it's closing due to the snow. Some schools have shut already but thankfully my daughter's school aren't soft!! ;-)

Take care out there in whatever weather you have, as I know that Sydney have had over 45 degrees today, so that won't be any fun either, as it can cause bushfires.

Wednesday, 14 November 2012

A quick sneaky post

Hello there
I'm being naughty and writing this post in bed, as 'him indoors' is away at the moment, so I can!
 I want to share a couple of cards I made tonight at a friend's Stamp-a-stack event. Catherine did a brilliant job of leading us rowdy crafters in the right direction, yet in a way which still let us have fun. 

This was the first one we made. You'll see that I've not done a very good job on matching up my layers. I love the cherry cobbler colour though. You can't tell from this photo but I also sprayed a homemade alcohol mist over the whisper white card sections. You use the Stampin' Up gold shimmer mist with some alcohol in a spray bottle - it's so much easier and prettier than glitter.
The next card was my favourite -
We were shown how to emboss only away from the centre piece - it's a great technique to provide a very effective look. It basically involves creating a home made thick stencil of the shape you want and placing that on the top of your 'sandwich' whilst running it through your Cuttlebug or whichever machine you own. I chose a scalloped card base, as I think it ties in well with the scalloped circle in the middle.
I had a fun night with my crafty friends and I've still got all the kit to make another 5 cards at least from Catherine.  We were too busy chatting to make a 'stack' :-)
Thanks again x

Take care out there and try to craft with friends as often as you can

Thursday, 18 October 2012

My babies

Hello there

Today's post is about two things. Firstly it's about a mini album I've made thanks to Carole Bryson Wood of Stampin' Up fame. I attended a class of hers at my friend's house last week and she gave us some cardstock to complete two projects.

I've just realised that I haven't blogged about the Christmas decoration we made that night, so I will rectify that situation now, albeit briefly.
The link I provided above will take you straight to Carole's blog with the instructions on how to make it. This one is slightly different as we used the gorgeous 3.5 in scalloped tulle ribbon in cherry cobbler colour- item number 127841 if you want to order some! Hey, maybe I should become a demo! :-)

                  -------------------------------------------------------------
Anyway, back on track Diane!

The mini album is really dinky and cute. The papers I used aren't really relevant to the subject of the photos; our two cocker spaniels but this album is a prototype for me, so I learnt some things along the way but still want to use the album.

The reason I chose photos of the dogs is that the poor little mites are at Cheshire Dogs' Home at the moment being neutered and micro chipped. It's so weird in the house without them and I keep thinking of them as they were led away from me to the kennels to wait for the operation. They'll be recovering by now. I do hope they're ok. Whenever the phone rings, I dash to the phone, as they said they might call us earlier than the collect time of 3 to 4.30p.m if they were stressed. The only stupid people on the phone are recorded messages from banks about claiming back PPI!! Sooo annoying, especially today.

For something different, I've made a video for you to watch,showing some of the stages of the project.


I'll try to remember to let you know how the boys got on. I've loved making the album and looking at the photos of the boys, so it's been a good day so far.

Take care out there

Saturday, 13 October 2012

Oooooo yes!

Hello there

Oooo yes indeed! I have enjoyed making this card from what started off with leftovers on my desk and then grew from there. All a creative process which gives me such a buzz. If you've read my blog before you'll recognize the background paper as being yet another section of the freebie papers I got from the issue 15 of Craftseller. What a load of things I've been able to make with that stash and it was only about 6 double sided pages or so. I have even thrown bits away (shock, horror!) and I'm now left with three pieces which of course coordinate and I'll use on a project in the near future. I've just had a peek at issue 16 and there's fabbo Christmas papers in there, so tonnes to get on with. Infact that's why I've stopped the magazine subscription i.e because I have too much paper/inspiration. It is a great magazine.There comes a point though, when you have to stop with the buying and get on with the creating. I also have to draw the line as space is a premium and I can't stand feeling hemmed in, although I'm far from that, that's the way I want it to stay..... I am a hypocrite really though, as I bought a little 6 x 6in paper pad yesterday which was very naughty!


The stamped image was 'pinched' during a crafty session at a friend's house a few weeks ago when I just stamped a few images on cardstock and I've been using them in various things. It's from the Stampin' Up Apothecary Art set. The cardstock was SU very vanilla I think; it's definitely creamy coloured.


You'll hopefully also notice the texture I added behind that stamped image in the form of spider's web by Kanban. I bought the white roll and last night I just put some red and green ink onto my craft mat, sprinkled a bit of water in both patches and then rubbed one strip of web into each one and left them to dry over night. I then cut them into basic leaf shapes and glued them on. Cool!


Machine stitching the scallops was good fun too and
adds even more depth to the card and it's just fun! :-)

I made the envelope with the help of my Ultimate Pro as I invariably do. The embossing is from one of the boards. I inked around the edges with SU's Pacific Point.

The sun is out now and I'm off cake baking with my daughter as it's her birthday on Monday and she wants this specific cake style, which I'll no doubt show you at some point. Her being 14 years old is scary for me but I still love her to bits and bobs, so all's well.

Take care out there

Saturday, 22 September 2012

Points of interest

Hello there

I made the card shown out of stuff lying around my table. You may well recognise the papers which have still not all been used up; they're from the December issue 15 of Craftseller 2012. The little embellishments are what was left of a frame I cut out recently from Ornamental Iron2. The leaves behind the 'for you' image are also remains of some I used recently- they were cut from Plantin School book. The 'for you' stamped image is one I got from what was meant to be a craft and chat session at a friends house on Tuesday but I just wasn't up to crafting, so I just pinched another friend's SU stamps and made some images to use later. So there one of them is. The little dots were created with Cosmic Shimmer acrylic glue. I ordered some in different colours this week, as I love the way Sue from particraft always uses them to make swirls and purely decorate her work. I created a scalloped edge for extra detail. In my humble opinion, you would never know that this was put together purely using my creative flow with bits off my desk.

Go on, I dare you; use your creative flow and use up some leftovers whilst you're at it!

This brings me nicely onto my first point of interest, which is that Cricut have now got an EU Facebook page. They've only got 107 likes at the moment so head over there if you're in Europe of course, as we may well get some prizes and deals which we can actually participate in, rather than it all be America based and out of our reach. I sent them a copy of this card, which they immediately shared with everyone, which made me happy.

Another point of interest is that for the first time ever I listened to a paperclipping transmission. For those who don't know, this is a radio type talk show with artists and crafters alike discussing a different topic each time. This talk was all about how you organise yourself to create; how do you remember to make a page about somethings; how do you deal with photos? It's very amateurish as when a guest speaks, they can't hear the other guests and presenter, so they often talked over each other, which I found highly irritating. Each guest is on the phone doing the interview; not in the studio.It's very indepth and in my opinion, it went on for far too long but still interesting to hear how other people sort themselves out. Head over there and see what you think. May Flaum was involved which is what got my initial interest but she wasn't at her best in the environment. Ali Edwards and Heidi Swapp are in a more current one, so maybe somebody who inspires you will be involved in one of them.

Very nice packages to receive and yes,
that is the brand new SU magazine full
of goodies plus the inks which
I'm going to have great fun with :-)


Another great crafty event for me this week was yesterday when the postman delivered these goodies.


Take care out there

Tuesday, 4 September 2012

Alcohol to spray

Hello there
I'm a happy girlie again as I bought these little beauties today - £3 for 4, so I bought 8 of course. Why? I hear you ask. Well, why not?! But why get excited about plastic bottles? Here's why:
Here's the alchohol. Not quite a bottle of wine but it's of more use to me than that. Carole Bryson Wood of Stampin' Up fame has told me how to make my own mists out of alchohol, water and re-inkers, so I'm getting all set up to start my own alchemy.

Bring it on!

Take care out there
p.s please visit  cheapfrankingmachinesupplies on ebay if you want to buy some alchohol yourself

Wednesday, 15 August 2012

Pencil case

Hello there

This is the pencil case I made for my daughter recently. She picked the materials, which I wasn't certain would be a good mix but they turned out brilliantly.

I'm getting to use the spotty material from my Stampin' Up-
Candy cane Christmas pack. I can't remember which
company made the loveheart material

I got the instructions from issue 13 of Craftseller magazine. Rebecca Tufnell's instructions aren't great, so I asked some further questions about it but I haven't had a reply, so I just carried on making it in my own little way. Once you start thinking for yourself with alot of instructions, it does all come together, as you use your sewing knowledge or basic common sense to make it all work ok.
Cut four pieces of fabric 13 x 22cm. Those are the measurements in the magazine. My zip was slightly bigger, so I adjusted the width.Two are for the outside and two are for the lining.
Along one long edge of each piece, fold over 1cm to the reverse side of fabric.
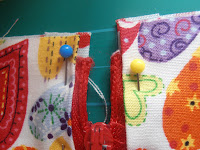
Along those folds, pin a lining piece and an outer piece of fabric to each side of the zip. The photo shows the right hand section with inner and outer pieces attached to the zip and only the inside piece attached on the left. Make sure that your outer pieces are attached to the correct side of the zip; the side with the zip handle uppermost. Wrong sides of the outer and the inner pieces will be facing.
ready to sew
Sewing
With right sides facing, sew a 1cm seam around the outer pieces around the three open edges. Do the same with the inner pieces, making sure that you leave a wide enough gap in it, to enable you to turn it round the right way. You sew that seam by hand with slip stitch, once it turned the right way.

Finished! I wasn't very happy with the finish, where the zip ends met the edge of the case, as I'm rubbish with zips but it closes ok; I'm just being fussy.
Go on try it; it's fun!

Take care out there
Related Posts Plugin for WordPress, Blogger...