Showing posts with label Ornamental Iron2. Show all posts

Friday, 3 May 2013

Being cheeky, works

Hello there


I am rather pleased with this card.

I've been cheeky, as I used a stamped image I got when I was on the Indigo Blu retreat in March. I did use some green on the leaves too but it's not that visible in this photo. I just wanted to add the slightest bit of colour to the image, to help maintain it's elegant pose. We were also given the pages from a copy of the Pride and Prejudice book at the retreat, as the image is of Elizabeth Bennett. I've yet to show you one of the projects we did with this book paper at the retreat, as I'm not happy with it yet; I still need to work on it to get it how I want it.

I cut the flower out of vellum using the Flower Shoppe cartridge- it's the scallop flower on page 13 of the booklet. The swirls in the background were created with a stamp I made from the lace 2 element on page 42 of the Ornamental Iron 2 cartridge. I used some leftover cuts I had of that element from a post I did last month - I put them behind the flower, as I've seen Sue Wilson do so many times and finally I get round to trying it out myself. 


Inside the card, I had a bit of a play and used vellum as the insert and stamped the swirl on it and the sentiment. What I quickly learnt is that vellum absorbs the ink and makes it swell out. I've got away with it on the swirls but the sentiment became illegible, so I had to stamp it again on the card and stick it over the old imprint. I'm not sure it's completely worked and be warned if you try it - be patient! Give it time to dry.


The box envelope was easy to create with my Ultimate Pro but the fun bit was stamping with white Stazon on acetate. I hadn't done this before. Ranger's Archival ink didn't seem to work i.e it didn't dry; which is odd as it did when I made the box for my Mother's Day present box  this year. I made the mistake though of asking Chris, who has a chemistry background, about what to use to clean my stamp with afterwards - therein followed a long speel about the various types of solvent inks and how they react and blah blah blah but he did help me realise that IPA was worth a shot and it worked!! I used the swirl stamp (which was created with Cricut cuttables) on an acrylic block and it cleaned them brilliantly without disintegrating them. One happy dance later and the box was complete.


Take care out there


Wouldn't it be cool if I really could have a swirl pattern
painted into the lawn with that stuff they use on
footall pitches :-)

Tuesday, 26 March 2013

One thing leads to another

Hello there

Oh gosh, how one piece of card can keep you busy for hours! I had just finished a card and I found a card blank with paper piercing all the way round it. I could see why I hadn't used it as the lines weren't straight, so I just ripped off the pierced bit and used the back. 

.........In a post of mine I told you about the swallowtail stamp. Last week Catherine held a 'four ways with the swallowtail' session at her house. Unfortunately, due to work commitments, I was an hour late, so I was too tired and late to get much done but I later finished them at home and I've just realised I haven't posted about them; but hey ho, I can't post about everything. Even, amazeballs me can't do everything!! ...... I certainly hope you all realise that's just my warped sense of humour :-) ................

Back to the blank piece of card. I decided immediately to rip yet another idea of Catherine's, which she told us about on her blog. I don't have a swirl stamp that was suitable, so I went about finding a swirl pattern on one of my Cricut cartridges and ended up using a rather pretty one from Ornamental Iron2 (lace2 function, size 6in, gate10b design on page 42 of the booklet). I cut a few samples first to ensure all was correct and I got the size I wanted and then I cut it out of 'Cricut cuttables' to make the stamp.

I had a piece of the patterned circles paper on my desk, as Catherine must've given it me in the pack from last week and it was the right size - vunderbar! :-) I improvised with the mat before that and also found some pretty flower embellishments, which I tried to make it look as if they were on a part of the swirl. I also used daffodil delight as the yellowy colour, as I don't have the colour Catherine used in her project. A sentiment stamp in the same Tangerine Tango colour as the butterfly, a rub of glimmer mist and a couple of stamps on the envelope and 'Bob's your uncle, Fanny's your aunt'; we're good to go :-) .... that's an old saying I was bought up with, which just means 'we're finished and ready to move on'.


Watch this space for a project soon, which will no doubt use those practice die-cut swirls I did for this and the matching stamp.


Take care out there
A sneaky pic of one of the boys, as it was
close to my card photos on the SD card.
One for you dog lovers out there :-)

Saturday, 15 September 2012

The journey is often most of the fun

Hello there

Today's card is yet another example of me using some recent papers from the Craftseller magazine. The papers are still sat on my desk, so the plan is to use them all up. I've no idea how long this'll take though, as I'm not the quickest at the best of times. I may well have hit upon a design I'm happy to duplicate, probably with little tweeks on each one to make them feel different.

Firstly I selected which papers I would use together. I placed them on the card blank I made to fit into the envelope I wanted. The card I saw which struck me to get me properly started was on particraft's blog. My card ended up being quite different to that indeed but it sparked my interest and gave me a focus on what elements I needed.

I then went into Word and typed out the sentiment in a colour I thought would match some of the circular images in the bottom patterned paper.

Next I went onto Cricut Craftroom as I knew that Ornamental Iron2 cartridge would have a frame type that I wanted. Sure enough it did. I made sure the frame was the right size to fit around the sentiment; which is one of the joys of CCR. I just happened to have a scrap of card, almost exactly the right size for this cut. I just LOVE it when that happens!
I thought that the sentiment wasn't quite right. So I searched for which leaf cuts I had on my Cricut and used some of the decorative paper (glued onto thicker paper, as the paper itself doesn't cut well at all without the extra support of more paper underneath it) to cut them out.

What you see in this photo is the decorative leaf pattern I inked along the inside bottom of the card. I used dusty concord distress ink on my craft mat, with a few sprinkles of water thrown in. I dabbed a small section of my old bath sponge and used the negative of the leaf die cut as a stencil. I also LOVE doing this!


Even more use of leftover die cuts was made on the envelope. I coloured the frame leftovers with dusty concord.
 
 
The final version is totally different to my original inspiration but that's how it is for me usually. I take it along the path which is open to me; which papers I have, which equipment I have, how much time I have. It's a creative process after all.

Take care out there

Thursday, 13 September 2012

Challenging life

Hello there

The challenge entry version
Today's little entry for my blog is indeed about challenging life. Some of you will read that to mean that you need to challenge life and all the difficult times it can present us with. Others of you will read that as that my life is challenging at the moment. That's fine. The both meanings are relevant in this context but it's also linked to the fact that I entered a blog challenge over on The Crafty Network's blog.

Entries for the challenge had to be emailed by midnight last night i.e Wednesday September 12th 2012. I only finally decided to make something at 9p.m. This isn't an ideal situation for creating pretty stuff when you've been up since 5. At work for eight hours from 6a.m. It also doesn't help to have had issues to deal with at home. I felt that I had to commit to entering though. May Flaum has recently discussed this very issue recently, in that we often have to fight for our right to craft, so to speak. We all have things in our lives which pull us away from crafting but if you really enjoy it, you need to make some sacrifices along the way to enable you to do it. For many of us, that involves lack of sleep! Find a hidden drive within you to keep your muse flowing and you'll reap the benefits without a doubt.

I finally emailed a photo of the card at 11p.m. I could barely keep my eyes open and I was keeping Chris up, as he's sleeping in my craft room/guest room because he has bronchitis. He was useful for helping me with some awkward glueing though, as I couldn't leave sections to dry as I would normally do.

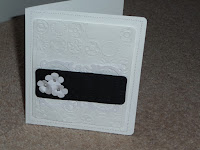
I firstly embossed white card with my new and much loved 'Bloom dots' folder and rounded the edges. I then did the same to a black piece of card. The flowers were created on my Cricut using Flower Shoppe cartridge- scallop4 cut at 2cm. The swirly frame was cut using Ornamental Iron2 - lace2 cut at 4cm. I then put some self-adhesive gems in the flower hearts. I used Pinflair glue gel to raise the various sections off the base, as that creates shadows, forming more black to tie in with the theme 'Black and White' of the challenge.
The finishing touch at the time was machine sewing around the edge of the card blank. I am annoyed that the holes at the top aren't straight- this was my second attempt too but at the time, I didn't have the energy or time to try again, so I had to run with it as it was. I didn't do a sentiment for exactly the same reason.
Final version
This morning I've fiddled with it some more. I sprayed some Perfect Pearls Mists - perfect pearl, all over the card. I added some more gems to the swirly section and created the sentiment tag. I'm surprised at how much I like it, as normally I love colour. I also decorated the envelope with some black paint and a stencil created by the swirly die-cut.

If you see the other entries for the challenge, you'll see that I don't stand a chance of winning but that's ok. I am proud that I entered and with a project that I'm happy with (although I'm happier with the final version than I am with the entered version).

Take care out there and keep crafting as much as you can!

Monday, 21 May 2012

Baptism card

Hello there
Well, what do you think? You like it?.... What?! You think it's a bit basic?! Not very decorative?! Rough and ready?!!
Honestly, what's a girl to do to please you lot?! ...... Hee hee, you'll be glad to hear that I haven't completely lost all my senses, as this is purely a dummy run for a card I'm making for a friend. Actually I need to make two, so I want to get them right. In fact the breaking news is that this was my very first commission, so the pressure was on. AND for a friend - no stress then?!!

On one of my Pinterest boards you'll see where I got the inspiration for this design; a Pinterest pin. I used the foil behind the cross on this little sample though because I had seen a different card design which included a metallic background but I didn't pin it, so then couldn't find it. The moral of this story is fairly obvious!
The original design just used a fancy shape to put the recipient's name onto and a butterfly. To my mind, that wasn't significant enough, so I chose an open book design instead, which I had to grab from t'internet and put into Word and then add the text. I did try using CraftArtist but for some reason it didn't 'like' the jpeg document and it appeared all blurred. I originally selected a verse from Matthew to put into the book, as it was about Jesus's baptism but my 'client' said that this verse from Deuteronomy was her preferred verse to display. So there it is. I had a debate as whether to ink or not to ink around the edges, which I even got 'him indoors' involved with. I decided to go without ink in the end, as the card mat below it is pink and therefore blends the book in, whereas it needed to be highlighted in my opinion.

The card blank was basically 6.5in square.

I had to get the cross shapes from ebay as I don't have the wedding Cricut cartridge they were created from..............
(There's another thing on my wish list and now that I've got myself a job, I might have more chance of getting it, although that salary is almost spent already and I'm a month off pay day)........
That placed me under pressure too as despite paying for them on 7th May, they didn't arrive until May 16th. Thankfully I had the foresight to make the majority of the card up, whilst waiting for the crosses to arrive.

The decorative swirls were cut from Ornamental Iron2 cartridge - lace 2 function of gate 10c, size 2.833 (w) x 2.528 (h).

My next dilemma was, to blingify or not to blingify- yes I know, that's not really a word but just roll with it for my sake :-)  These cards are for two special ladies, so in my opinion blingifying is ESSENTIAL!

Bling free
Blinged

Hopefully you agree with me. I know they're only tiny but it's all in the detail!

Yet another decision I had to make was what to have on the envelope. I had created some extra swirly designs but in the end I decided upon shadow versions of the cross; which is of course the most important thing on this project.
Ta dah!
I hope that the ladies have a great event to remember forever.

Take care out there

Wednesday, 2 May 2012

The other Silver Anniversary card

Hello there

In my previous post I showed you the Silver Anniversary card I made for a friend. This is the one I made after that due to my lack of confidence and belief in myself basically. You never know when you might need a Silver Anniversary card as well :-) Stocking up on cards is something I don't do anywhere near enough of.
Once I'd collected some things together and got some inspiration, off I went and before I knew it was all done. It all just flowed really nicely and gave me back confidence that I wasn't 'losing it'.
I used a A4 card folded to make an A5. I cut the My Mind's Eye paper as a mat. Found some other silver shaded card to cut the corners (corner3)from Ornamental Iron2 cartridge at 2in and then cut the flower head in a light blue paper.
The numbers were also cut from Ornamental Iron2 -gate2a and gate5a. I can't remember what size I did them, I'm sorry.  I'd suggest using scrap paper to cut with first, then you can adjust the size and see for 'real' whether they look good or not on the layout.

The mat for the numbers was cut at 3.5in from Plantin Schoolbook. I handcut the mat for the glasses, so I've no idea what size that was - I just cut the card with the glasses in place, so that I knew how big to cut it. I inked all the edges of the mats and the sentiment label with silver, which isn't all that noticeable but it's all in the detail, as they say!


The sentiment was written in CraftArtist using the Cupid and hearts kit and printed on the same blue paper as the flower heads.
I also put a patterned paper with silver card mat inside the card, as it's double sided card and far too dark a colour to be able to write the wishes on
The envelope was made with my Ultimate Pro and the frame was from a pack of American Crafts thickers over a blue paper background; again necessary due to the patterned paper of the envelope.
This makes it look green but it wasn't - the colours were bluey silver throughout
I wonder which one you would chose.

Take care out there
Related Posts Plugin for WordPress, Blogger...